
AudiencePoint and iPost Integration
Integrate AudiencePoint with iPost to help you better understand subscriber engagement and improve campaign performance.
Once connected, AudiencePoint can analyze your iPost lists, score contacts based on engagement and reachability, and write those scores back into iPost. You can then use those scores inside of iPost to build Dynamic Lists, improve targeting, and focus campaigns on the subscribers most likely to engage.
Most teams complete setup in under an hour.
What Does This Integration Do?
- Imports iPost lists into AudiencePoint as Audiences.
- Scores subscribers based on engagement and reachability.
- Writes AudiencePoint scores back into iPost contact records.
- Lets you use those score fields to build Dynamic Lists and improve campaign targeting.
Before You Begin
Make sure you have the following:
- Access to your AudiencePoint account.
- Access to your iPost Enterprise account.
- At least one populated static list in iPost.
Step 1: Gather the Information You’ll Need
Before creating the integration in AudiencePoint, you’ll need to gather a few details.
- Your login to iPost Enterprise; i.e your Client ID (username) and Client Secret (password)
- Your login to AudiencePoint
- The client token from iPost
- Log in to iPost Enterprise
- Open iPost’s General Settings (the gear/cog icon in the upper right).
- Select Client and copy your Client Token.
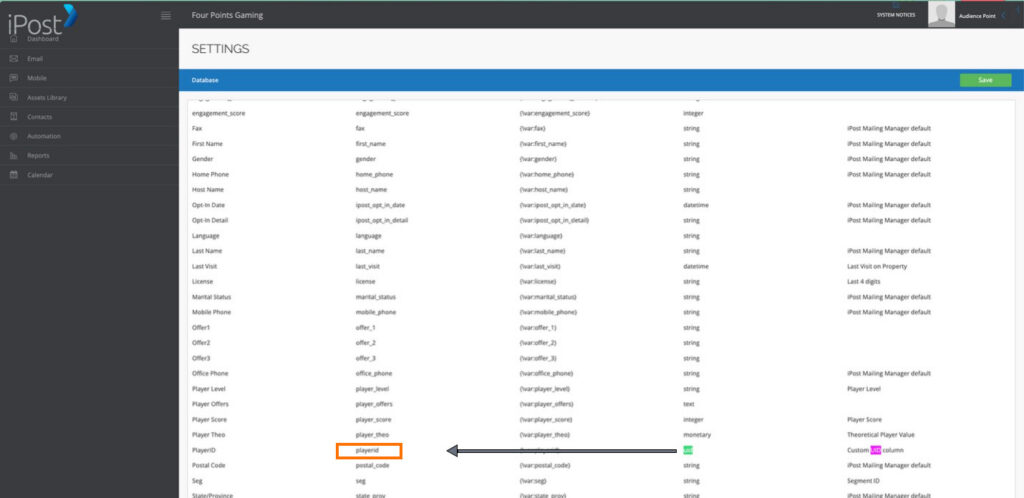
- column name you used for UID in iPost
- Log in to iPost Enterprise
- Go back to the General Settings menu and select Database.
- Look for a row with a Type of uid (tip: use CMD-F / CTRL-F to search for the text “uid”). If found, copy the value from that row’s Column Name field.
- If no uid field displays, continue to the next step (you’ll leave this field blank when setting up the integration).
Step 2: Create the Integration in AudiencePoint
Next, we’ll go into AudiencePoint and create the integration.
- Log in to AudiencePoint.
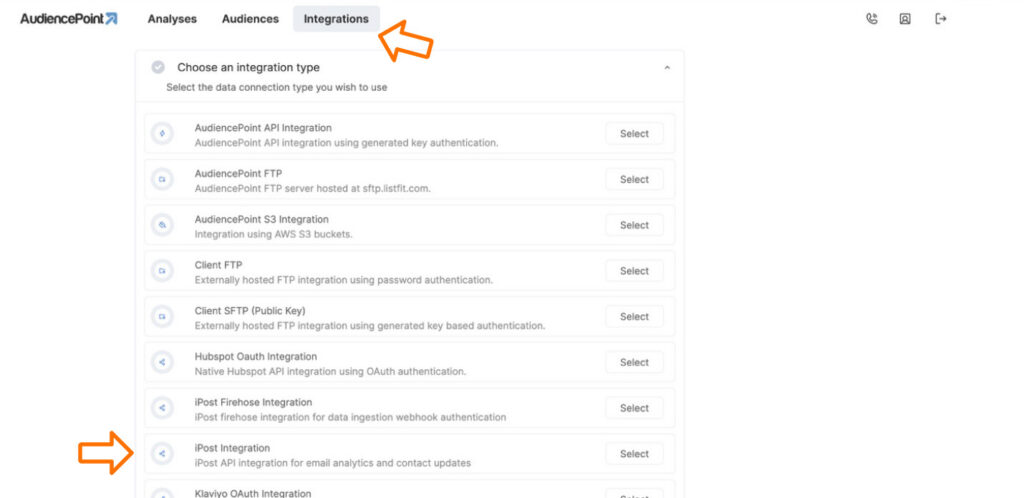
- Open Integrations.
- Click New.
- Select iPost Integration.
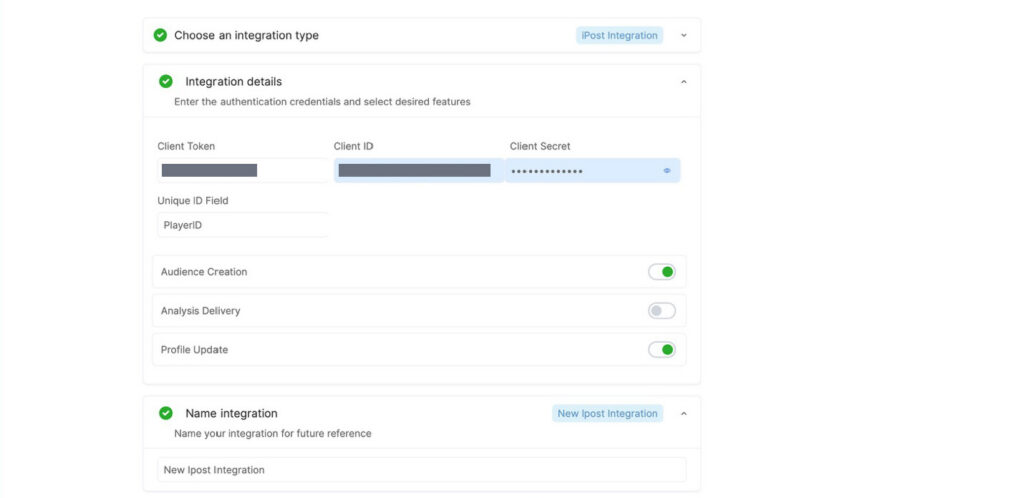
- Enter the Client Token you saved earlier.
- Enter your iPost Client ID (username) and Client Secret (password)
- Enter the UID field if your account uses one.
- Enable Audience Creation so you can import iPost lists into AudiencePoint as Audiences.
- Enable Profile Update so AudiencePoint scores can be written back to your iPost contacts.
- Provide a name for the integration.
- Click Save.
Verify the Connection
- The integration appears in AudiencePoint.
- No errors or warnings are displayed.
- Audience Creation and Profile Update are enabled.
Step 3: Enable the Engagement Feed
The iPost Integration created in Step 2 allows AudiencePoint to access your lists and write scores back to contacts.
The Engagement Feed is a separate connection that streams campaign activity such as opens, clicks, bounces, complaints, and unsubscribes to AudiencePoint in near real time. While optional, it unlocks some of AudiencePoint’s most powerful insights and is strongly recommended.
- In AudiencePoint, open Integrations.
- Click New.
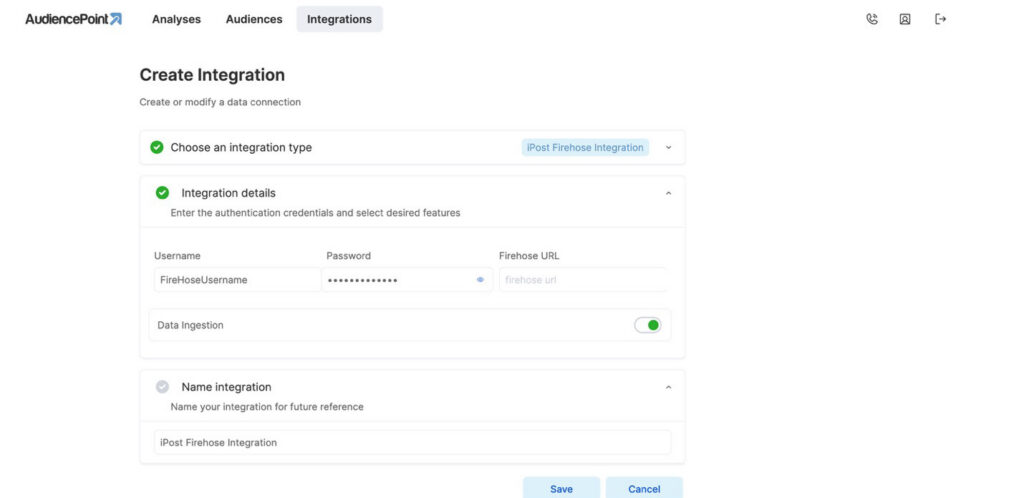
- Select iPost Firehose Integration.
- Create a new username and password for the feed.
- Enable Data Ingestion.
- Enable Profile Update if you want engagement insights and scoring data from this Firehose connection written back to iPost.
- Important: Leave the Firehose URL field blank.
- Provide a name for the integration
- Save the integration. The Firehose URL should now populate.
- Retrieve your Firehose URL from the saved integration. You will also receive this URL via the email associated with your logged-in AudiencePoint user.
Step 4: Configure the Feed Inside iPost
Next, configure the feed inside iPost.
- Log in to iPost Enterprise.
- Open General Settings.
- Select iPost Confluxery, then Firehose.
- Paste your Firehose URL into the Endpoint URL field.
- Enter the username and password you created.
- Select the following event types:
- Click
- Open
- Complaint
- Sends
- Bounces
- Unsubscribe
- Click Save.
Verify the Engagement Feed
- The Firehose integration appears in AudiencePoint.
- Data begins syncing successfully.
- No integration errors are displayed.
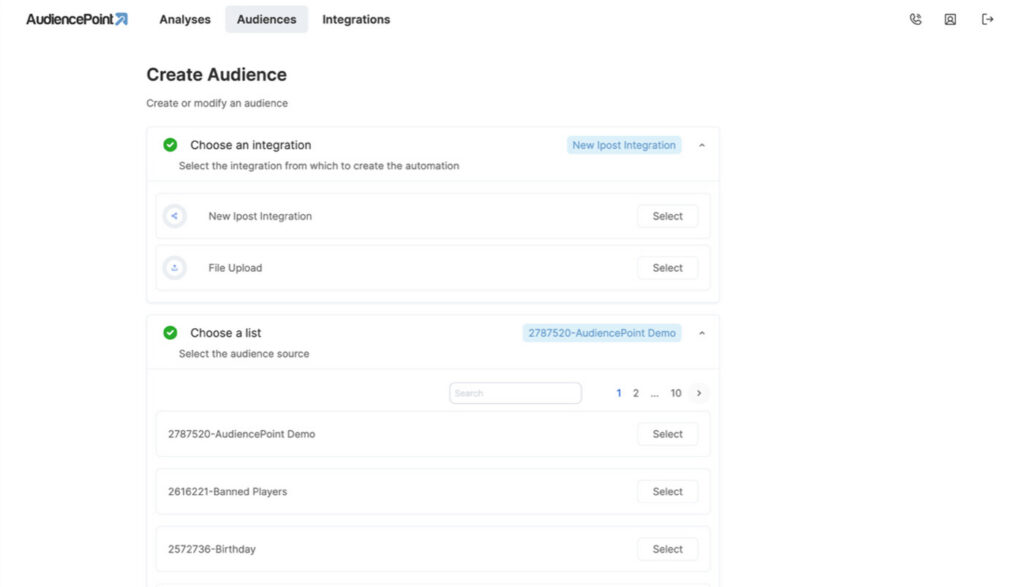
Step 5: Create an Audience
An Audience is simply an iPost list that has been imported into AudiencePoint for analysis.
- Open Audiences in AudiencePoint.
- Click New.
- Select your iPost Integration.
- Choose a static iPost list that contains contacts.
- Name the Audience.
- Click Save.
- Allow processing to complete.
Verify the Audience
- The Audience appears in AudiencePoint.
- The contact count matches the source iPost list.
- No import errors are displayed.
Step 6: Run Your First Analysis
Analyses are where AudiencePoint evaluates subscriber engagement and generates scores that can be written back into iPost.
- Open Analyses.
- Click New.
- Select your Audience.
- Choose an analysis type such as Spruce Engagement (recency-based engagement analysis).
- Name the analysis.
- Click Save.
- Allow processing to complete.

View Your Results in iPost
- Log in to iPost Enterprise.
- Open Contacts and then Lists.
- Select the list used to create your Audience.
- Review the AudiencePoint score fields that have been added to your contacts. The specific fields available will depend on the analyses you run.
Verify the Analysis
- The analysis completes successfully.
- Results are visible in AudiencePoint.
- AudiencePoint score fields appear on contacts in iPost.
Troubleshooting
If your first analysis stops partway through, run it again. During the first analysis, AudiencePoint may need to create new score fields inside iPost, and occasionally iPost does not create all fields on the first attempt.
Running the analysis a second time typically resolves the issue, because the remaining AudiencePoint fields are created during the second pass.
Next Steps
Once scores are available in iPost, create Dynamic Lists based on AudiencePoint scoring fields. These lists automatically update as new analyses run, helping you continually target the subscribers most likely to engage.
Need Help?
If you have questions about setup or troubleshooting, contact your AudiencePoint representative for assistance.